
I’m excited to share my love for Portuguese Pastéis de Nata. This traditional dessert has won many hearts. It’s a mix of flaky pastry and creamy custard.
Exploring Portuguese Pastéis de Nata reminds me of keeping traditions alive. It’s a must-try for those who love authentic Portuguese flavors. I’m here to guide you through this tasty journey.
These tarts have a long history, dating back to the 18th century. They’re a big part of Portuguese food and loved worldwide. If you love sweets or want to try something new, these tarts are perfect.
A Sweet Journey to Portugal’s Most Beloved Pastry
Exploring Portuguese custard tart, I found a long history. It started in monasteries, where monks made it during fasts. The recipe changed over time, becoming a key part of Portuguese food.
My first try of Portuguese custard tart was unforgettable. The crust was flaky, and the filling was creamy and sweet. It was love at first bite. I wanted to learn more about this pastry.
The Birth of Pastéis de Nata
Pastéis de Nata began in the 18th century at the Jerónimos Monastery in Lisbon. Monks made the recipe. Soon, bakeries all over Portugal were making their own versions.
Why These Tarts Conquered the World
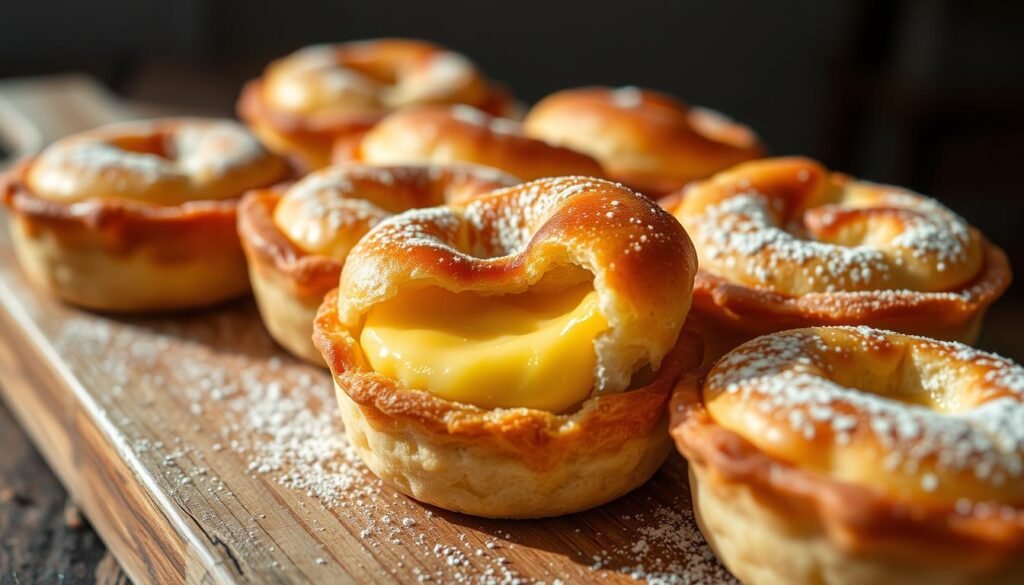
So, why do people love Portuguese custard tart so much? It’s because of the mix of textures and tastes. The crust is flaky, and the filling is creamy and sweet. The caramelized top adds a nice crunch. It’s a perfect combination.
My First Taste of Portuguese Custard Tarts
Thinking back to my first taste of Portuguese custard tart, I remember its power. It was more than just a taste. It was a journey, a connection to culture, and a love for pastry-making.
| Ingredient | Quantity |
|---|---|
| Eggs | 4 |
| Sugar | 1 cup |
| Flour | 2 cups |
Essential Ingredients for Authentic Portuguese Pastéis de Nata
To make Pastéis de Nata, start with the right ingredients. Use fresh, high-quality stuff. For the dough, you need flour, cold butter, and a bit of salt.
The custard filling needs egg yolks, sugar, milk, and vanilla.
Choose ingredients that are fresh and of good quality. Eggs from local farms, real vanilla, and quality sugar matter a lot. Here’s a list of what you need:
| Ingredient | Quantity |
|---|---|
| All-purpose flour | 2 cups |
| Cold unsalted butter | 1 cup |
| Granulated sugar | 1 cup |
| Large egg yolks | 4 |
| Whole milk | 1 cup |
| Vanilla extract | 1 tsp |
With these ingredients, you’re ready to make a tasty Portuguese dessert. Pick the best ingredients for a great baking time.
Kitchen Tools You’ll Need
To make a Portuguese custard tart easy, you need the right tools. Quality equipment makes a big difference. It helps get a flaky crust and creamy custard.
When I started making Pastéis de Nata, I found many tools. Traditional and modern tools both have their uses. A traditional tart mold shapes your tarts well. A modern oven with temperature control bakes them perfectly.
Traditional vs Modern Equipment
Traditional tools like a wooden spoon work well. So do modern tools like a stand mixer. Choose what fits your baking style best. The right tools make baking fun and rewarding.
Tart Mold Options
There are many tart molds out there. You can choose from metal to silicone molds. A good mold makes your tarts look and feel better. Look for one that’s durable and easy to clean.
Temperature Control Essentials
Temperature control is key for baking tarts. A digital thermometer checks your oven’s temperature. A temperature control device keeps it steady. These tools help get a golden crust and creamy custard.
Making the Perfect Flaky Pastry Base
To make a real Portuguese custard tart, start with a flaky pastry base. An easy pastry recipe is key. Follow a few steps to make a delicious, flaky crust.
First, mix flour, cold butter, and a pinch of salt. Use a pastry blender or your fingers to mix until it looks like coarse crumbs. Then, add cold water slowly, stirring with a fork until it forms a ball. Wrap it in plastic wrap and chill for at least 30 minutes.
Next, roll out the dough on a floured surface to 1/8 inch thickness. Use a tart mold or glass to cut out circles. Gather scraps and re-roll as needed. Press each circle into the mold, trimming edges to fit.
Now, fill your pastry with creamy custard. This is a key part of the Portuguese custard tart. With an easy pastry recipe, you’re on your way to a delicious tart that will wow everyone.
Creating the Creamy Custard Filling
To make a real Portuguese custard tart, the custard filling is key. It makes Pastéis de Nata special. Making the custard filling right takes patience and care. You need to temper eggs, cook the custard just right, and avoid mistakes.
Tempering eggs is very important when making this dessert. It keeps the eggs smooth when mixed with hot milk. With a simple recipe, you can make a delicious Portuguese dessert.
Tempering the Eggs
Tempering eggs is a big step in making custard filling. You slowly add hot milk to eggs while whisking. This keeps the eggs from scrambling. It’s a bit tricky but very important for a smooth filling.
Achieving the Right Consistency
Getting the right consistency is also key. The filling should be thick but still pourable. Cooking the custard to the right temperature and whisking helps get it just right.
The Art of Assembly and Baking
Now, let’s get to the final steps of making Portuguese tarts. The assembly and baking are key. You need to have everything ready and follow a simple process. Baking these tarts well takes some skill, but it’s doable.
Start by filling the pastry shells with custard. Make sure to leave a little room around the edges. This helps the tarts bake evenly and prevents the filling from overflowing. After filling, they’re ready for the oven.
To bake them right, use the right oven temperature and time. Here’s a quick guide:
| Temperature | Baking Time | Result |
|---|---|---|
| 400°F (200°C) | 20-25 minutes | Golden brown edges and a creamy filling |
| 425°F (220°C) | 15-20 minutes | Caramelized edges and a slightly firmer filling |
By following these steps, you can bake Portuguese tarts like a pro. They’ll be a hit with your friends and family.

Troubleshooting Your Portuguese Custard Tarts
As I worked on my Portuguese custard tarts, I hit some common problems. I’ll share easy fixes to help you avoid these issues. You might face soggy crusts, overcooked fillings, or uneven browning. These tips will help you solve these problems.
For crust issues, make sure your pastry is flaky and cooked right. A dense or undercooked crust can make the tart soggy. Try adjusting your baking time or temperature to get a golden brown crust.
Filling problems can also happen. If your filling is too runny or overcooked, it’s hard to get it right. To fix this, temper your eggs and adjust the cooking time. With these tips, you’ll get your filling just right.
| Common Problems | Solutions |
|---|---|
| Soggy Crust | Adjust baking time or temperature |
| Overcooked Filling | Temper eggs and adjust cooking time |
| Uneven Browning | Rotate tarts during baking |
By using these troubleshooting tips, you’ll make delicious Portuguese custard tarts. They’ll impress everyone. Remember, solving these problems is all about finding the right balance of flavors and textures.
Serving and Storage Tips
Serving Portuguese dessert like Pastéis de Nata is key. It’s best to serve them at room temperature or warm. This brings out their flavors and textures.
For storing, use an airtight container. Keep them in the fridge for up to 3 days.
Here’s how to keep them fresh:
| Storage Method | Shelf Life |
| — | — |
| Room Temperature | 1 day |
| Refrigerator | 3 days |
| Freezer | 2 months |
These tips help you enjoy your tarts for longer. Always serve them fresh. Serving Portuguese dessert at gatherings impresses guests.

Conclusion: Your Gateway to Portuguese Pastry Excellence
We’ve ended our journey through Portuguese Pastéis de Nata. I hope you now love these custard tarts more. You know how to make Portuguese pastries at home.
Baking is a journey. With each try, you get better. So, keep trying and enjoy making these treats. The more you make, the better you’ll get.
Keep exploring Portuguese food. Try more pastries that people love. You’re ready to be great at making Portuguese pastry.