
I’m excited to share a unique Halloween treat with you – Eyeball cake pops. They’re fun and delicious, perfect for parties. I’ll show you how to make them.
These treats are great for Halloween. They’re spooky yet cute. They’ll be a hit at any Halloween party.
Making Eyeball cake pops is fun for everyone. I’ll guide you through making them. From the cake to the final touches, you’ll see why they’re perfect for Halloween.
Creating the Perfect Halloween Party Dessert
I always look for spooky and tasty desserts for Halloween. Eyeball Cake Pops are perfect. They’re easy to eat, make lots, and look great for Halloween. Plus, they can be many flavors.
To make Eyeball Cake Pops, you need a few things. You’ll need a cake pop maker, candy melts, and lollipop sticks. Planning is key, too, if you’re making a lot for a party. Here’s what to think about:
Why Eyeball Cake Pops Are Halloween Party Winners
Eyeball Cake Pops are perfect for Halloween parties. They’re simple to make and can match your party theme. They’re also a fun change from usual desserts like cupcakes and cookies. You can make lots of designs and flavors, great for big parties.
Essential Tools and Equipment
To make Eyeball Cake Pops, you need some basic tools. You’ll need a cake pop maker, candy melts, and lollipop sticks. You’ll also need baking basics like a bowl and spoon. Here’s what you’ll need:
| Tool/Equipment | Description |
|---|---|
| Cake Pop Maker | A device used to shape and bake cake pops |
| Candy Melts | A type of chocolate used to coat cake pops |
| Lollipop Sticks | Sticks used to hold cake pops |
Planning Your Cake Pop Production
Planning is key for making lots of cake pops for a party. Think about how many you want, their flavor and design, and how much time you have. With planning and the right tools, you can make yummy and spooky Eyeball Cake Pops for any Halloween party.
Ingredients for Spooktacular Eyeball Cake Pops
To make these spooky treats, you need some key Eyeball cake pops ingredients. You’ll need a cake mix, like vanilla or chocolate. These flavors are great for Halloween.
Frosting is also important. It helps mix the cake crumbs together. This makes the cake pops smooth and consistent.
Candy melts are crucial for coating the pops. They give a shiny look. Edible markers are needed for the iris and pupil details. With these Eyeball cake pops ingredients, you’re ready to make a spooky Halloween dessert.
When making the recipe, try different flavors. This makes the cake pops unique and tasty. It’s all about having fun and being creative.
By following a simple recipe and using the right Eyeball cake pops ingredients, you’ll impress everyone. Your Halloween dessert will be a hit.
With these ingredients and a bit of imagination, you can make many Eyeball cake pops designs. So, start baking and enjoy your Eyeball cake pops recipe!
Making the Basic Cake Pop Mixture
To make the perfect cake pop mixture, start by baking a simple cake. Use a recipe you know works well. Bake it until it’s fully cooked.
The cake should be moist but not too wet. If it’s too dry, shaping into balls is hard. Too wet, and it’s hard to work with.
Using the right baking techniques is key. Mix all-purpose flour and granulated sugar for a tender crumb. Butter and oil add flavor and moisture. These tips help make a delicious cake base for cake pops.

After baking, crumble the cake and mix it with frosting. The frosting binds the cake and adds flavor. Aim for a mix like playdough – easy to shape but not too sticky.
Baking the Perfect Cake Base
For a perfect cake base, use flour, sugar, and unsalted butter. Add vanilla extract for flavor. A simple recipe and right techniques make a tasty cake base for cake pops.
Creating the Right Consistency
Getting the right mix is key for cake pops. If it’s too dry, add more frosting. Too wet, add more cake. Adjusting the mix makes shaping and decorating easier.
Troubleshooting Common Mixture Problems
Problems like a too dry or wet mix can happen. Fix these by adding more frosting or cake. Troubleshooting helps make perfect cake pops for any event.
| Cake Pop Mixture Tips | Description |
|---|---|
| Use the right consistency | Achieve a mixture that’s moist but not too wet |
| Adjust the amount of frosting | Add more frosting to moisten the mixture or less to dry it out |
| Use a combination of cake and frosting | Combine cake and frosting to create a delicious and moist cake pop mixture |
Shaping and Preparing Your Eyeball Cake Pops
Now that the cake pop mix is ready, it’s time to shape it. You can shape it by hand or with a cake pop maker. I like using my hands to make the balls. It helps me control their size and shape.
After shaping, the balls need to chill. This makes them firm before dipping in candy melts. To get ready for dipping, stick a lollipop stick into each ball. This stick will be the handle for your Eyeball Cake Pop.
Shaping the cake pops is key to making these spooky treats. By carefully shaping and preparing, your cake pops will be perfect for dipping and decorating. Getting them ready for coating is also important. It helps the candy melts stick well and gives a smooth look.
The Art of Dipping and Coating
Dipping and coating are key steps for perfect eyeball cake pops. It’s important to dip them in candy melts smoothly. The candy melts must be at the right temperature.
Temperature Control Tips
Keep the candy melts between 80°F and 90°F for the best results. If they’re too thick, add a bit of shortening. If they’re too thin, heat them up a bit.
Achieving Smooth Coverage
For a realistic eyeball look, make sure to cover the cake pop fully. Then, gently tap off any extra coating. This avoids a thick, uneven finish.
Fixing Common Coating Issues
Issues like too thick or too thin candy melts can be fixed. Just adjust the temperature or add shortening. With practice, you’ll get smooth, even coatings and amazing eyeball cake pops.
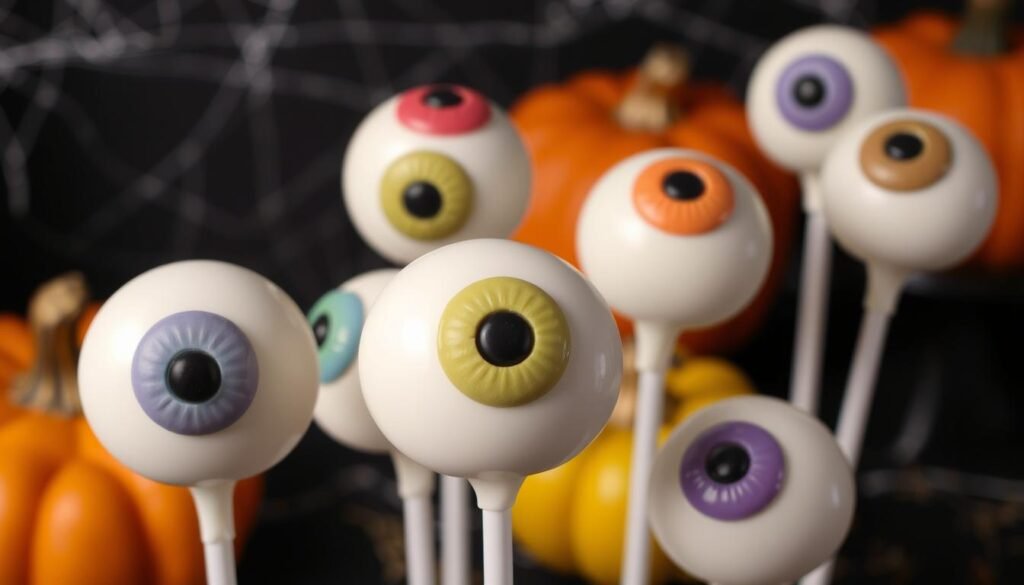
Decorating Techniques for Realistic Eyeball Effects
To get realistic eyeball effects on your cake pops, focus on the details. Decorating them needs patience and creativity. Use the right tools and materials to make the iris and pupil.
Adding bloodshot details is key. Use red edible markers or candy melts for this. It makes your cake pops look spooky and real, great for Halloween.

For realistic eyeball effects, use different colors for the iris. Add a black dot for the pupil. Use a toothpick or knife for texture and detail. Practice these tips to impress everyone.
Creating the Iris and Pupil
For the iris and pupil, pick the right colors and techniques. Use blue, green, and yellow markers or candy melts for the iris. A black dot makes the pupil.
Adding Bloodshot Details
To add bloodshot details, use red markers or candy melts. This makes your cake pops look real and spooky. Take your time to decorate them well.
| Decorating Technique | Materials Needed | Tips and Tricks |
|---|---|---|
| Creating the Iris and Pupil | Edible markers or candy melts, toothpick or small knife | Use a variety of colors to create a realistic iris, add a small dot of black candy melt or edible marker to create the pupil |
| Adding Bloodshot Details | Red edible markers or small lines of red candy melts | Use a toothpick or small knife to create texture and detail on the cake pop, add a small amount of red candy melt or edible marker to create a bloodshot effect |
Creative Variations for Your Eyeball Cake Pops
Exploring different flavors and decorations opens up endless possibilities for Eyeball Cake Pops. You can make unique cake pops that wow your loved ones. Try using red velvet or carrot cake for a special taste.
Adding sprinkles or edible glitter can make your cake pops festive. You can also shape them into squares or rectangles for a cool eyeball look. Remember, it’s all about having fun and trying new things.
Some ideas for creative variations of Eyeball Cake Pops include:
| Variation | Description |
|---|---|
| Strawberry Shortcake Eyeballs | Use strawberry cake and frosting for a fruity Eyeball Cake Pop |
| Mint Chocolate Chip Eyeballs | Make a refreshing Eyeball Cake Pop with mint chocolate chip cake and frosting |
| Glittery Eyeballs | Add edible glitter for a sparkly and festive touch |
Trying these creative variations can elevate your Eyeball Cake Pops. They can be a unique and tasty treat. Whether you’re experienced or new to baking, there’s always room to experiment and create something special.
Storage and Make-Ahead Tips
To keep your Eyeball Cake Pops fresh, store them right. Use an airtight container at room temperature. This keeps their texture and taste good.
If you make them early, store them in the fridge for up to a week. This is great for big Halloween parties. You can prepare your cake pops ahead of time.
When storing, make sure they are dry. This stops them from getting soggy. Don’t put them in direct sunlight. Sunlight can melt the chocolate and make the cake stale.
| Storage Method | Duration | Temperature |
|---|---|---|
| Airtight container | Up to 3 days | Room temperature |
| Refrigerator | Up to 1 week | 40°F (4°C) |
Follow these tips to enjoy your Eyeball Cake Pops at your Halloween party. You’ll impress your guests with your baking.
Presenting Your Spooky Sweet Creations at Halloween Parties
Now you know how to make Eyeball Cake Pops. It’s time to show them off at your Halloween party. Place the cake pops on a festive platter or stand.
Surround them with spooky decorations like fake spiders or cobwebs. You can also serve them on decorative sticks. This makes them easy to grab.
These treats will be the star of your Halloween party. Your friends and family will love them. They’ll be amazed by your creativity and baking skills.
So, get ready to wow them with your Eyeball Cake Pops at your next Halloween party!